")
Cub U-Turn Ultralight Tent Stove & Stovepipe
$280.00


See More Images +
See Fewer Images -
OVERVIEW:
Limited Closeout – While Supplies Last!
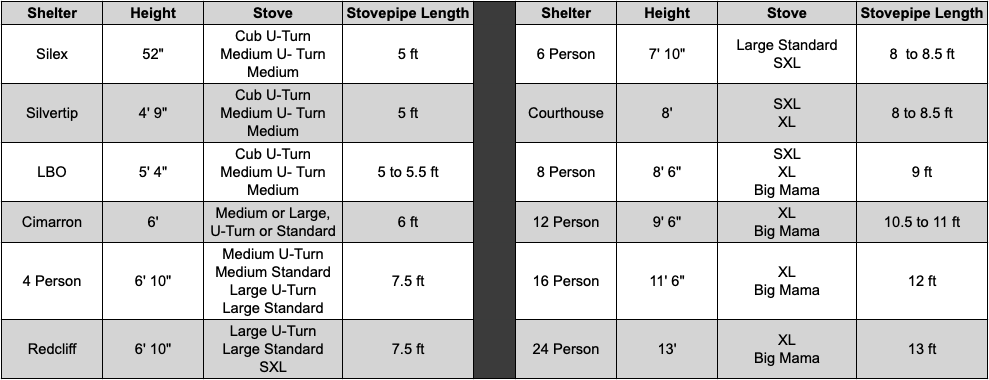
Perfect for the Silex, Guardian, or Silvertip.
The U-Turn Titanium Tent Stove is an ultralight version of our classic stoves, crafted with lightweight titanium foil for the sides and back, plus a smaller-diameter stovepipe and damper (not interchangeable with our other stoves).
Designed for minimalists, the U-Turn delivers the same easy assembly and usability as our box stoves but shaves off significant weight—12 oz lighter vs a medium standard stove with 6 feet of pipe! While it rivals cylinder stoves in weight, it outperforms them in sturdiness, ease of setup, and cooking convenience (thanks to its flat top).
Ideal for fastpacking, snow melting, or quick heat, the U-Turn is a go-to for those who want serious performance without the bulk.
The Cub U-Turn is perfect for solo shelters, taking off the chill, or drying gear. Just remember—small stoves burn hot but need frequent feeding.
Grab yours before they're gone!
Features:
- Titanium construction
- Intake control
- Sliding door
- Damper with integral spark arrestor
- Stove packs down to roughly 10.25" X 14" X .75" tall
- Stovepipe rolls up to roughly 9.5" long cylinder 2.5" in diameter (held in place by pipe rings)
Specs:
- Weight - 15 oz - including damper, legs, hardware, and storage bag
- Storage tube adds 3 oz
- Pipe Weight - 2.5" diameter pipe weighs 1.5 oz per foot
- Dimensions:
- Firebox Height - 6"
- Firebox Width - 6"
- Firebox Length - 9"
- Stove assembled height (with legs) - 9"
- All Titanium Construction - Top and bottom are 30 gauge Grade I, U-Turn sides, and pipe are titanium foil.
Note: All U-turn stoves are assembled the same way!
What to Expect:
Stoves add comfort, the ability to dry gear, and gives cold weather trips an element of enjoyment and fun that is lacking without the stove. They allow you to go to bed warm and dry, and to warm up first thing in the morning. They can also extend or replace cooking fuel weight.
They don't however, replace sleeping gear insulation. The stoves burn hot and fast, but to keep the temps up they need to be fed regularly. So if you have a forecast for 0° then you should have a 0° rated bag, unless you want to stay up all night stoking the fire.
Longer burn times require larger wood. If you prep larger wood you can get through the night with 3-4 stokings. In our opinion a good beefy knife for batoning rounds and a good quality folding or lightweight saw are all the tools you need for wood prep, and are superior to a hatchet or axe for most users.

Made in the U.S.A from the best materials sourced both domestically and globally
Specifications:
- Burn chamber 6" Tall / 6" Wide / 9" long
- Height with legs 9 inches
- Weight of stove including damper, legs, hardware, and storage bag, is 15 oz
- Storage tube adds 3 oz
- Stovepipe weighs 1.5 oz per foot
- Made in CO, USA
Comes With:
- Stove box (front, Uturn side, top, bottom, door)
- Legs & hardware needed to assemble
- Intake control
- Damper
- Spark arrestor
- Storage tube
- Storage bag
- If purchased with stovepipe, we send enough pipe rings for the pipe length selected
Instructions:
- Stove Assembly - lay bottom out and assemble sides, back, front into the grooves. Put top on, then keeping pressure on top and bottom insert one leg from bottom through top. Install wingnut on top, then install wingnut on bottom and tension. It is much easier to install the next three legs, just repeat the process. The flat based weld nuts are feet.
- When burning for the first time, do not over tighten the stove box or you will cause warping.
- Clean the titanium before the first burn - any fingerprints will heat set and be there forever.
- Pipe Assembly - The pipe is a bear to roll the first time, but after burning it is a cinch. The first burn heat sets the pipe, and gives it memory of the stovepipe shape. To roll it the first time, take your time, and wear gloves. Start on one end, carefully rolling the pipe into an elongated cone shape until you can slip the first ring on. Milk that ring down the pipe slowly, adding more rings as you go. Alternatively, you can use two or more people to make the job go quicker. The lazy man's way is to take a long piece of PVC and use that to help roll the pipe into shape.
- The pipe goes around the damper. Slide the lower pipe ring up to give some room for expansion, slip the pipe over the damper, then lower the pipe ring to tighten.
- Make sure there are no crinkles or creases in the pipe before the first burn, or they will be there forever.
- Fire Starting - Wetfire, Instafire, trioxane, commercial paraffin wax infused cardboard products (sold for starting charcoal grills), or vaseline soaked cotton balls all work great for starting fires in our stoves. With one of these lit in the middle to back of the stove, start by placing small twigs or shavings on top, leaving plenty of breathing room until it's going well. Once a good coal bed is going you can place rounds in. More traditional fire starting with jute twine, charcloth, flint and steel, shavings, etc, are crazy fun but unfortunately not in our stoves. The door size limits access and the commercial or home prep fire starters work better.
- Advanced Tip - A handy DIY solution to keep the damper in the position you want is to source some small coil springs and e-clips from a hardware store. Put the spring on the damper control (the shepherds crook side) so that it places tension against the damper pipe. Back this spring with an e-clip (retainer clip) and the damper stays put. You'll burn through the spring after a few good fires, but they only cost cents per piece, so it's cheap to have several in your stove bag.
TOP ACCESSORIES:
WARRANTY:
Defects in manufacturing and material for the practical lifetime of the product. Damage due to wear and tear or misuse will be repaired for a reasonable charge.
VIDEOS:
MEDIA:
Recommended Products
-
-

Stove Pipe Rings
$9.95