|
Seek Outside stoves are cut, bent, and built with computer controlled equipment to ensure precise and uniform dimensions. Feel secure in knowing that our stoves are the highest quality of their type, with tight tolerances that control air flow through the firebox and materials that will last through years of tough use.
We design our stoves to be a blend of strength, durability, ease of use, heat transfer, and weight. Titanium is very light, tough, and handles high heat loads very well.
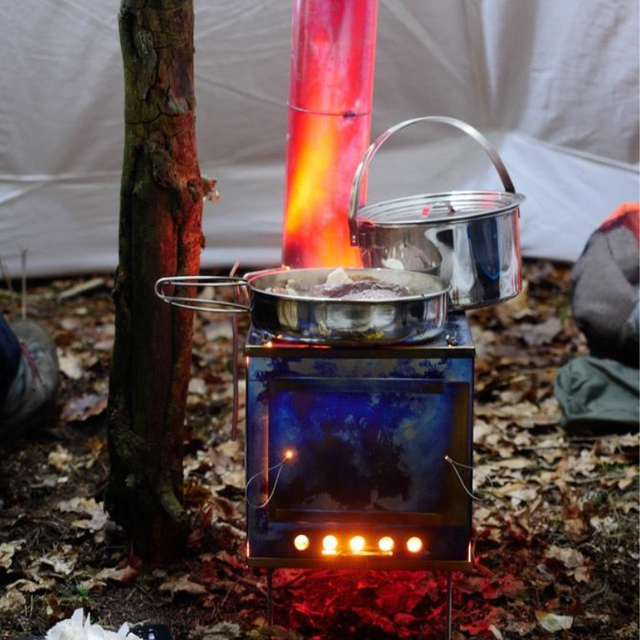
Our stoves feature a front intake control, tight tolerances, and a functional damper that allows you to easily control airflow through the firebox. The flat top makes cooking a breeze. Our stoves are built well enough that if you're good with your fire starting you can have a cup of boiling water only 6-7 minutes after lighting the flame.
Select stove pipe length using the chart below. Stove does NOT include pipe unless you select a pipe length.
Tent stoves can be dangerous. Fire is extremely hot and should be handled with caution. Misuse can lead to serious injury or damage. By using our tent stoves, the user assumes all risk and responsibility. We are not liable for any damages, injuries, or negligence related to their use. Practice safe handling and fire safety at all times. Purchasing this stove signifies your agreement to these terms of use.
Features:
- Titanium construction
- Intake control
- Sliding door
- Damper with integral spark arrestor
- Stove packs down to roughly 8.25" X 14" X 3" tall
- Stovepipe rolls up to roughly 12" long cylinder 3 1/8" in diameter (held in place by pipe rings)
- Adding a glass door? Don't worry, you will still get the standard titanium door as well!
What to Expect:
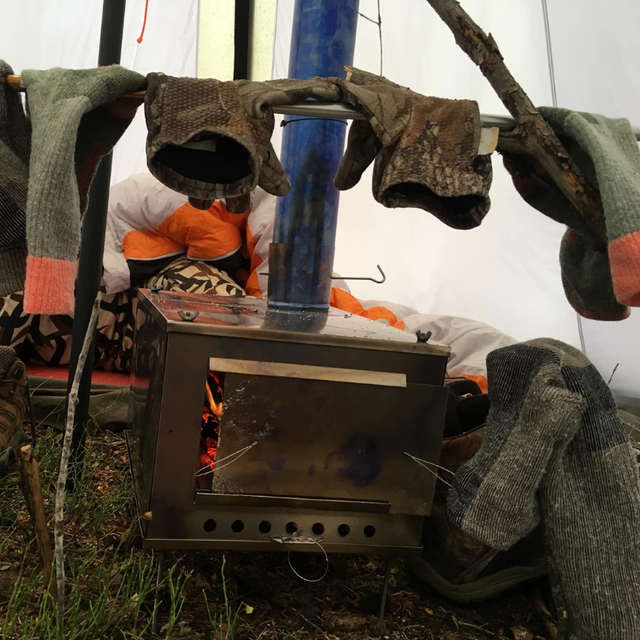
Stoves add comfort, the ability to dry gear, and gives cold weather trips an element of enjoyment and fun that is lacking without the stove. They allow you to go to bed warm and dry, and to warm up first thing in the morning. They can also extend or replace cooking fuel weight.
They don't however, replace sleeping gear insulation. The stoves burn hot and fast, but to keep the temps up they need to be fed regularly. So if you have a forecast for 0° then you should have a 0° rated bag, unless you want to stay up all night stoking the fire.
Longer burn times require larger wood. If you prep larger wood you can get through the night with 3-4 stokings. In our opinion a good beefy knife for batoning rounds and a good quality folding or lightweight saw are all the tools you need for wood prep, and are superior to a hatchet or axe for most users.

Made in the U.S.A from the best materials sourced both domestically and globally
Specifications:
- Burn Chamber 8.25" Tall / 8.25" Wide / 14" long
- Height with legs 12 inches
- Weight of Stove including Damper, legs, hardware, and Storage bag, is 35 oz.
- Stovepipe weighs 2 oz per foot
- Made in CO, USA
Comes With:
- Stove box (front, back, sides, top, bottom, door)
- Legs & hardware needed to assemble
- Intake control
- Damper
- Spark arrestor
- Zippered storage bag
- If purchased with stovepipe, we send enough pipe rings for the pipe length selected

Instructions:
- Stove Assembly - lay bottom out and assemble sides, back, front into the grooves. Put top on, then keeping pressure on top and bottom insert one leg from bottom through top. Install wingnut on top, then install wingnut on bottom and tension. It is much easier to install the next three legs, just repeat the process. The flat based weld nuts are feet.
- When burning for the first time, do not over tighten the stove box or you will cause warping.
- Clean the titanium before the first burn - any fingerprints will heat set and be there forever.
- Pipe Assembly - The pipe is a bear to roll the first time, but after burning it is a cinch. The first burn heat sets the pipe, and gives it memory of the stovepipe shape. To roll it the first time, take your time, and wear gloves. Start on one end, carefully rolling the pipe into an elongated cone shape until you can slip the first ring on. Milk that ring down the pipe slowly, adding more rings as you go. Alternatively, you can use two or more people to make the job go quicker. The lazy man's way is to take a long piece of PVC and use that to help roll the pipe into shape.
- The pipe goes around the damper. Slide the lower pipe ring up to give some room for expansion, slip the pipe over the damper, then lower the pipe ring to tighten.
- Make sure there are no crinkles or creases in the pipe before the first burn, or they will be there forever.
- Fire Starting - Wetfire, Instafire, trioxane, commercial paraffin wax infused cardboard products (sold for starting charcoal grills), or vaseline soaked cotton balls all work great for starting fires in our stoves. With one of these lit in the middle to back of the stove, start by placing small twigs or shavings on top, leaving plenty of breathing room until it's going well. Once a good coal bed is going you can place rounds in. More traditional fire starting with jute twine, charcloth, flint and steel, shavings, etc, are crazy fun but unfortunately not in our stoves. The door size limits access and the commercial or home prep fire starters work better.
- Advanced Tip - A handy DIY solution to keep the damper in the position you want is to source some small coil springs and e-clips from a hardware store. Put the spring on the damper control (the shepherds crook side) so that it places tension against the damper pipe. Back this spring with an e-clip (retainer clip) and the damper stays put. You'll burn through the spring after a few good fires, but they only cost cents per piece, so it's cheap to have several in your stove bag.
Comparison Chart:

|
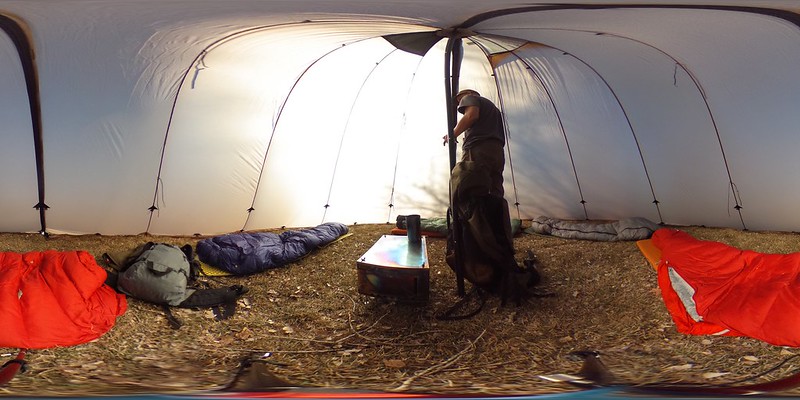
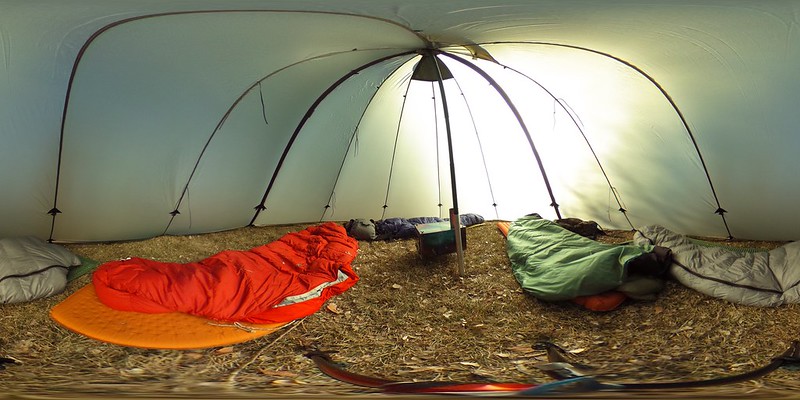
The 12 Person Lightweight Tipi is roomy, storm worthy and offers stand up & walk around space. A truly sustainable backcountry home, great for family camping, late season hunting, winter adventures or a base camp. It is capable of sleeping up to 12 with minimal gear, or 6 people with a stove. Handmade in Grand Junction, CO.
FEATURES:
- Flexi Pitch: Convert the 12 person tipi into an 8 person by pitching with just guy out points for group size versatility.
- Sod Skirt: Fabric skirt on the bottom of the tipi to keep out dirt, drafts, and insects.
- Dual Zippered Doors With Rain Flaps for easy access from either side and waterproofness.
- Peak Vent for ventilation and condensation prevention.
- Hang Loops: to attach 12 Person Liners, gear, and accessories inside tent, keeping items off the ground.
SIZE GUIDE:
- Sleeps 12 without stove
- Sleeps 6 with stove
- Sleeps 4 standard cots with a stove
- Need one size smaller? See the 8 Person Tipi
- Need one size bigger? See the 16 Person Tipi
SPECIFICATIONS:
Weight:
- Canopy: 108 oz / 6 lb 12 oz
- Complete weight - canopy, stakes, aluminum pole - 192 oz / 12 lb 1 oz
Dimensions:
- Height: 9' 6″
- Diameter: 18' 10"
- Square Feet: 260
- Square Feet Sitting Area (height above 36"): 120
- Square Feet Standing Area (height above 6 ft): 61
MATERIALS:
Tent Fabric
- Olive Green 30 Denier Nylon 6.6 Ripstop
- 3000 mm hydrostatic head
- 33% more abrasion resistant than nylon 6
- Ripstop woven, Silicone coated
Stove Jack
- Silicone-coated Fiberglass
- 3,000 f melting point
- Tear and heat resistant material
Peak Cone
- VX42 Xpac, Dyneema
- 2 layered fabrics for extreme tear strength
- Fray and Abrasion Resistant
COMES WITH:
- Aluminum Pole - 6 sections
- 12 twisted stakes and 12 standard stakes.
- Silnet Seam Sealer
PITCHING:
- Put in the primary door stake.
- Take the opposite door stake loop and stretch the tipi out taut (not stretched). Decide where you want to sleep or where to place the stove.
- Place your hand on the door guyout, fold the fabric towards the opposite door. The guyout is the middle of the fold. The stake loop lands very close to the proper setback. (Setback is 2X distance from guyout to sod skirt below stake loop in door.)
- Start setting the seam stake loops next to the doors first, then move from door to door, using the side setbacks.
- The recommended setbacks are for a standard no guy out pitch. If you want more space or better snow shedding, move the setbacks in towards the center by 1-2 inches from the recommended setback, raise the pole by an inch, and use the side guy outs.
Watch Here!
SEAM SEALING:
- To seal the shelter, pitch it normally and seal the outside seams. Note: this is difficult on taller tents
- You can run a thin bead of sealant along the seam, press it in with a finger, and wipe away excess on a paper towel.
- Alternatively, you can use an acid brush from a hardware store to spread the sealant.
Seam Sealing Service
INFO ON HOT TENTS:
Temperature Rating
- We use high temp silicone coated fiberglass material, rated to several thousand degrees, for the stove jack. The tent material never touches the hot pipe. If there are any pinholes from floating embers, they can be sealed with a small dab of silicone without damaging the shelter.
Condensation
Carbon Monoxide
- Carbon monoxide is not a concern in these shelters due to the peak vent and air flow from the zipper and sod skirt. If necessary, leave a door unzipped for more venting
FAQ:
12 Person Standing / Sitting 360 VR
|
Seek Outside stoves are cut, bent, and built with computer controlled equipment to ensure precise and uniform dimensions. Feel secure in knowing that our stoves are the highest quality of their type, with tight tolerances that control air flow through the firebox and materials that will last through years of tough use.
We design our stoves to be a blend of strength, durability, ease of use, heat transfer, and weight. Titanium is very light, tough, and handles high heat loads very well.
Our stoves feature a front intake control, tight tolerances, and a functional damper that allows you to easily control airflow through the firebox. The flat top makes cooking a breeze. Our stoves are built well enough that if you're good with your fire starting you can have a cup of boiling water only 6-7 minutes after lighting the flame.
Select stove pipe length using the chart below. Stove does NOT include pipe unless you select a pipe length.
Tent stoves can be dangerous. Fire is extremely hot and should be handled with caution. Misuse can lead to serious injury or damage. By using our tent stoves, the user assumes all risk and responsibility. We are not liable for any damages, injuries, or negligence related to their use. Practice safe handling and fire safety at all times. Purchasing this stove signifies your agreement to these terms of use.
Features:
- Titanium construction
- Intake control
- Sliding door
- Damper with integral spark arrestor
- Stove packs down to roughly 10.25" X 14" X 3" tall
- Stovepipe rolls up to roughly 12" long cylinder 3 1/8" in diameter (held in place by pipe rings)
- Adding a glass door? Don't worry, you will still receive the titanium door as well!
What to Expect:
Stoves add comfort, the ability to dry gear, and gives cold weather trips an element of enjoyment and fun that is lacking without the stove. They allow you to go to bed warm and dry, and to warm up first thing in the morning. They can also extend or replace cooking fuel weight.
They don't however, replace sleeping gear insulation. The stoves burn hot and fast, but to keep the temps up they need to be fed regularly. So if you have a forecast for 0° then you should have a 0° rated bag, unless you want to stay up all night stoking the fire.
Longer burn times require larger wood. If you prep larger wood you can get through the night with 3-4 stokings. In our opinion a good beefy knife for batoning rounds and a good quality folding or lightweight saw are all the tools you need for wood prep, and are superior to a hatchet or axe for most users.
Made in the U.S.A from the best materials sourced both domestically and globally
Specifications:
- Burn Chamber 10.25" Tall / 10.25" Wide / 14" long
- Height with legs 15 inches
- Weight of Stove including Damper, legs, hardware, and Storage bag, is 50 oz.
- Stovepipe weighs 2 oz per foot
- Made in CO, USA
Comes With:
- Stove box (front, back, sides, top, bottom, door)
- Legs & hardware needed to assemble
- Intake control
- Damper
- Spark arrestor
- Zippered storage bag
- If purchased with stovepipe, we send enough pipe rings for the pipe length selected
Instructions:
- Stove Assembly - lay bottom out and assemble sides, back, front into the grooves. Put top on, then keeping pressure on top and bottom insert one leg from bottom through top. Install wingnut on top, then install wingnut on bottom and tension. It is much easier to install the next three legs, just repeat the process. The flat based weld nuts are feet.
- When burning for the first time, do not over tighten the stove box or you will cause warping.
- Clean the titanium before the first burn - any fingerprints will heat set and be there forever.
- Pipe Assembly - The pipe is a bear to roll the first time, but after burning it is a cinch. The first burn heat sets the pipe, and gives it memory of the stovepipe shape. To roll it the first time, take your time, and wear gloves. Start on one end, carefully rolling the pipe into an elongated cone shape until you can slip the first ring on. Milk that ring down the pipe slowly, adding more rings as you go. Alternatively, you can use two or more people to make the job go quicker. The lazy man's way is to take a long piece of PVC and use that to help roll the pipe into shape.
- The pipe goes around the damper. Slide the lower pipe ring up to give some room for expansion, slip the pipe over the damper, then lower the pipe ring to tighten.
- Make sure there are no crinkles or creases in the pipe before the first burn, or they will be there forever.
- Fire Starting - Wetfire, Instafire, trioxane, commercial paraffin wax infused cardboard products (sold for starting charcoal grills), or vaseline soaked cotton balls all work great for starting fires in our stoves. With one of these lit in the middle to back of the stove, start by placing small twigs or shavings on top, leaving plenty of breathing room until it's going well. Once a good coal bed is going you can place rounds in. More traditional fire starting with jute twine, charcloth, flint and steel, shavings, etc, are crazy fun but unfortunately not in our stoves. The door size limits access and the commercial or home prep fire starters work better.
- Advanced Tip - A handy DIY solution to keep the damper in the position you want is to source some small coil springs and e-clips from a hardware store. Put the spring on the damper control (the shepherds crook side) so that it places tension against the damper pipe. Back this spring with an e-clip (retainer clip) and the damper stays put. You'll burn through the spring after a few good fires, but they only cost cents per piece, so it's cheap to have several in your stove bag.
Comparison Chart
|
The Medium collapsible wood burning backpacking stove is cut, bent, and built with computer controlled equipment to ensure precise and uniform quality. Feel secure in knowing that our tent stoves are the highest quality of their type, with tight tolerances that control air flow through the firebox and materials that will last through years of tough use.
We design our tent stoves to be a blend of strength, durability, ease of use, heat transfer, and weight. Titanium is very light, tough, and handles high heat loads very well.
Our stoves feature a front intake control, tight tolerances, and a functional damper that allows you to easily control airflow through the firebox. The flat top makes cooking a breeze. Our stoves are built well enough that if you're good with your fire starting you can have a cup of boiling water only 6-7 minutes after lighting the flame.
Select stove pipe length using the chart below. Stove does NOT include pipe unless you select a pipe length.
Tent stoves can be dangerous. Fire is extremely hot and should be handled with caution. Misuse can lead to serious injury or damage. By using our tent stoves, the user assumes all risk and responsibility. We are not liable for any damages, injuries, or negligence related to their use. Practice safe handling and fire safety at all times. Purchasing this stove signifies your agreement to these terms of use.
FEATURES:
- Titanium construction
- Intake control
- Sliding door
- Damper with integral spark arrestor
- Stove packs down to roughly 10.25" X 8" X 3" tall
- Stovepipe rolls up to roughly 12" long cylinder 2 .5" in diameter (held in place by pipe rings)
- Note that Medium Stoves come with a 2.5" stovepipe vs the 3 1/8" pipe of larger standard stoves.
OPTIONS:
- Pipe Length
- We cut the stove pipe to the desired length. See the stove chart under the "Videos & Media" Tab for suggested lengths for your tent
- Folding Saw
- We sell our favorite folding saw from Silky Saws. The silky gomboy makes a great fire wood cutter and folds down nicely into our packs
- Glass Door
- glass door is a great addition to your stove. Just 7 ounces and made from tempered ceramic glass, it doesn't add much weight and makes the flame easier to manage. If you add the glass door, you will still receive the standard titanium door as well!
WHAT TO EXPECT
Stoves add comfort, the ability to dry gear, and gives cold weather trips an element of enjoyment and fun that is lacking without the tent stove. They allow you to go to bed warm and dry, and to warm up first thing in the morning. They can also extend or replace cooking fuel weight.
They don't however, replace sleeping gear insulation. The stoves burn hot and fast, but to keep the temps up they need to be fed regularly. So if you have a forecast for 0° then you should have a 0° rated bag, unless you want to stay up all night stoking the fire.
Longer burn times require larger wood. If you prep larger wood you can get through the night with 3-4 stokings. In our opinion a good beefy knife for batoning rounds and a good quality folding or lightweight saw are all the tools you need for wood prep, and are superior to a hatchet or axe for most users.
Made in the U.S.A from the best materials sourced both domestically and globally
Specifications:
- Burn Chamber 8.25" Tall / 8.25" Wide / 10" long
- Height with legs 12 inches
- Weight of Stove including Damper, legs, hardware, and Storage bag, is 31 oz.
- Stovepipe weighs 1.5 oz per foot
- Made in CO, USA
COMES WITH:
- Stove box (front, back, sides, top, bottom, door)
- Legs & hardware needed to assemble
- Intake control
- Damper
- Spark arrestor
- Zippered storage bag
- If purchased with stovepipe, we send enough pipe rings for the pipe length selected
Instructions:
- Stove Assembly - lay bottom out and assemble sides, back, front into the grooves. Put top on, then keeping pressure on top and bottom insert one leg from bottom through top. Install wingnut on top, then install wingnut on bottom and tension. It is much easier to install the next three legs, just repeat the process. The flat based weld nuts are feet.
- When burning for the first time, do not over tighten the stove box or you will cause warping.
- Clean the titanium before the first burn - any fingerprints will heat set and be there forever.
- Pipe Assembly - The pipe is a bear to roll the first time, but after burning it is a cinch. The first burn heat sets the pipe, and gives it memory of the stovepipe shape. To roll it the first time, take your time, and wear gloves. Start on one end, carefully rolling the pipe into an elongated cone shape until you can slip the first ring on. Milk that ring down the pipe slowly, adding more rings as you go. Alternatively, you can use two or more people to make the job go quicker. The lazy man's way is to take a long piece of PVC and use that to help roll the pipe into shape.
- The pipe goes around the damper. Slide the lower pipe ring up to give some room for expansion, slip the pipe over the damper, then lower the pipe ring to tighten.
- Make sure there are no crinkles or creases in the pipe before the first burn, or they will be there forever.
- Fire Starting - Wetfire, Instafire, trioxane, commercial paraffin wax infused cardboard products (sold for starting charcoal grills), or vaseline soaked cotton balls all work great for starting fires in our stoves. With one of these lit in the middle to back of the stove, start by placing small twigs or shavings on top, leaving plenty of breathing room until it's going well. Once a good coal bed is going you can place rounds in. More traditional fire starting with jute twine, charcloth, flint and steel, shavings, etc, are crazy fun but unfortunately not in our stoves. The door size limits access and the commercial or home prep fire starters work better.
- Advanced Tip - A handy DIY solution to keep the damper in the position you want is to source some small coil springs and e-clips from a hardware store. Put the spring on the damper control (the shepherds crook side) so that it places tension against the damper pipe. Back this spring with an e-clip (retainer clip) and the damper stays put. You'll burn through the spring after a few good fires, but they only cost cents per piece, so it's cheap to have several in your stove bag.
FAQ
Q: Will this stove melt if I get my fire too hot?
A: Titanium has a 3000 degree melting point, so you an burn anything short of jet fuel in this stove without fear of melting it.
Q: Will this stove melt my tent?
A: Only if you aren't careful. Our stove jack is fire resistant and protects the stove pipe from touching the tent. If you let your tent wall touch a hot stove, it will melt.
Q: What size tent should I use the Medium stove in?
A: This stove is recommended for our 2 person tents like the Guardian or Silvertip. If you are trying to save weight, it can also work in the Twilight 3 person tent or Cimarron 4 person tent.
Q: Can I use this stove in a non Seek Outside Tent?
A: Probably. If your tent has a fire-resistant stove jack and is rated for use with a stove, our stoves will work. Check with the tent manufacturer for stove pipe length and make sure their tent is compatible with a tent wood burning stove.
Q: What fuel works best?
A: Dry hardwoods offer a longer burn time. Avoid wet or resinous woods whenever possible as they create more sparks, smoke and creosol buildup. Tips for starting a fire in a hot tent here
Q: Can one person backpack with this stove?
A: Yes. This stove packs down flat and compact, weights less than 3 lbs making it easy to carry.
Q: Can you cook on this stove?
A: The medium stove does not have a lot of surface area to rest a cook pot, but it is sturdy enough to cook on and can boil water in just a few minutes.
Comparison Chart:
|
Constructed from ultra-durable 30 Denier Nylon 6.6 Ripstop, The Eight Person Lightweight Tipi is roomy, storm worthy and offers stand up & walk around space. This versatile 8 man tent combines the spacious comfort of a family camping shelter with the rugged performance of a backcountry hunting tent. Designed as a premium 8 man tipi, it features weather-resistant construction that stands up to winter adventures and late season storms.
This sustainable four-season shelter excels as both a base camp and expedition tent, offering exceptional livable space. Perfect for hunters, outdoor enthusiasts, and adventure families, it sleeps eight with gear or four with a wood stove - the ultimate blend of traditional tipi comfort and modern tent technology for serious backcountry use.
Handmade in Grand Junction, CO.
FEATURES:
- Flexi Pitch: Convert 8 person tipi into 6 person by pitching with just guy out points for group size versatility.
- Sod Skirt: Fabric skirt on the bottom of the tipi to keep out dirt, drafts, and insects.
- Dual Zippered Doors With Rain Flaps for easy access from either side and waterproofness.
- Peak Vent for ventilation and condensation prevention.
- Hang Loops: to attach 8 Person Liners, gear, and accessories inside tent, keeping items off the ground.
SIZE GUIDE:
- Sleeps 8 without stove
- Sleeps 4 with stove
- Sleeps 2 standard cots with a stove
- Need one size smaller? See the 6 Person Tipi
- Need one size bigger? See the 12 Person Tipi
SPECIFICATIONS:
Weight:
- Canopy: 68 oz / 4 lb 4 oz
- Complete weight - canopy, stakes, carbon pole - 111 oz / 6 lb 15 oz
- Door screens add 14 oz
- Aluminum pole adds 11 oz
Dimensions:
- Height: 8' 6″
- Diameter: 16'
- Square Feet: 195
- Square Feet Sitting Area (height above 36"): 84
- Square Feet Standing Area (height above 6 ft): 27
MATERIALS:
Tent Fabric
- 30 Denier Nylon 6.6 Ripstop
- 3000 mm hydrostatic head
- 33% more abrasion resistant than nylon 6
- Ripstop woven, Silicone coated
Stove Jack
- Silicone-coated Fiberglass
- 3,000 f melting point
- Tear and heat resistant material
Peak Cone
- VX42 Xpac, Dyneema
- 2 layered fabrics for extreme tear strength
- Fray and Abrasion Resistant
COMES WITH:
- Aluminum Pole - 6 sections
- 10 twisted stakes and 10 standard stakes.
- Silnet Seam Sealer
PITCHING:
- Put in the primary door stake.
- Take the opposite door stake loop and stretch the tipi out taut (not stretched). Decide where you want to sleep or where to place the stove.
- Place your hand on the door guyout, fold the fabric towards the opposite door. The guyout is the middle of the fold. The stake loop lands very close to the proper setback. (Setback is 2X distance from guyout to sod skirt below stake loop in door.)
- Start setting the seam stake loops next to the doors first, then move from door to door, using the side setbacks.
- The recommended setbacks are for a standard no guy out pitch. If you want more space or better snow shedding, move the setbacks in towards the center by 1-2 inches from the recommended setback, raise the pole by an inch, and use the side guy outs.
SEAM SEALING:
- To seal the shelter, pitch it normally and seal the outside seams. Note: this is difficult on taller tents
- You can run a thin bead of sealant along the seam, press it in with a finger, and wipe away excess on a paper towel.
- Alternatively, you can use an acid brush from a hardware store to spread the sealant.
Seam Sealing Service
INFO ON HOT TENTS:
Temperature Rating
- We use high temp silicone coated fiberglass material, rated to several thousand degrees, for the stove jack. The tent material never touches the hot pipe. If there are any pinholes from floating embers, they can be sealed with a small dab of silicone without damaging the shelter.
Condensation
Carbon Monoxide
- Carbon monoxide is not a concern in these shelters due to the peak vent and air flow from the zipper and sod skirt. If necessary, leave a door unzipped for more venting
FAQ:
Is this 8-person tipi tent suitable for winter camping?
Yes, this tent is specifically designed for winter use with its durable 30D Nylon 6.6 Ripstop fabric that has a 3000mm hydrostatic head rating, plus it comes standard with a heat-resistant stove jack that can withstand temperatures up to 3,000°F, making it perfect for cold-weather camping with a wood stove.
Will regular camping cots fit inside this 8 person tent?
We recommend using low-profile cots under 18 inches tall for best results, as the 16-foot diameter interior comfortably fits two standard cots with a wood stove in the center, or four cots without a stove while still leaving ample walking space.
How difficult is setup for one person?
Most users can set up this tipi solo in under 15 minutes thanks to the simple six-section center tent pole system, with no complicated frame assembly required like traditional dome tents.
Is an 8 person tent practical for backpacking trips?
At just 4 pounds 4 ounces for the canopy and under 7 pounds complete, this is one of the few truly packable 8-person shelters, compressing down to a 20-inch bundle that can be divided among group members for backcountry excursions.
How does this handle condensation in cold weather?
The natural airflow created by the tipi's peak vent significantly reduces moisture buildup, and adding the optional interior liner creates a thermal barrier that cuts condensation by over half while maintaining proper ventilation. When used with a wood stove, the dry heat of the stove also cuts some moisture from the air. Learn more about fighting condensation here
Why choose a tipi shape for harsh weather?
The steep 60-degree walls make snow slide right off the tent, and if any does accumulate, you can easily knock it off from the inside with a gentle push - no need to go outside in a storm. This simple but effective design has kept hunters and winter campers dry for generations, outperforming flatter-walled tents that trap snow and require constant brushing off. The smooth shape also lets high winds flow around the tent rather than catching against it, proven stable in gusts over 60 mph that would damage conventional tents.
How does this compare to canvas tents?
Our tipi weighs just 6 pounds 15 ounces - about 90% lighter than traditional 70+ pound canvas tents while shedding wind and snow more affectively. Unlike canvas that absorbs moisture and mildews, our 30D Silnylon dries quickly while offering superior abrasion resistance. You get the same spacious shelter and stove compatibility without the heavy weight or high maintenance of canvas.
Can you adjust the size of an 8-person tent for smaller groups?
Yes! The Flexi Pitch system lets you shrink the tent down for 6 people by using just the guy-out points—great for when you need versatile group camping gear without buying multiple tents.
Is this 8-person tent really waterproof for heavy rain?
Yes! The silicone-coated 30D ripstop nylon has a 3,000mm hydrostatic rating, plus rain flaps over the doors and stove jack. This makes it stormproof for rainy weather camping, while the abrasion-resistant fabric stands up to wind and tough use.
How tall is an 8-person tent, and can you stand up inside?
With a peak height of 8’6”, this tent offers generous headroom, but only the central 27 sq ft has full standing space (over 6 ft tall). The rest is perfect for sitting or sleeping, making it great for family camping or group basecamps where movement is needed.
8 Person Standing / Sitting 360 VR
8 Person 360 Look Around
| Fits our standard pipe (3.25") *Not Compatible with 2.5" U-Turn Stove Pipe or Medium stoves. This cap fits over then end of our standard titanium stove pipes to keep water and snow out of your stove. Recommended for basecampers that need to leave their tent and stove set up in one sport for extended periods, where unexpected weather might hit while the stove is out.
Use with extreme caution. The rain cap can cause sparks and embers to be directed towards you tent and may cause spark burns.
1.2 oz
|
Constructed from 30 Denier Nylon 6.6 Ripstop, The Six Person Lightweight Tipi is the ultimate backcountry retreat, accommodating up to six people during the summer months, or three individuals with a stove and plenty of headroom. With its conical shape, this tipi is designed to withstand even the most inclement weather conditions, and effectively deflects wind from any direction. It's the perfect choice for family camping trips, late-season hunting excursions, or winter adventures. Handmade in Grand Junction, CO.
Meateater's Article on the Best Camping Tents
FEATURES:
- Flexi Pitch: Convert 6 person tipi into 4 person by pitching with the 10 guy out points for group size versatility.
- Sod Skirt: Fabric skirt on the bottom of the tipi to keep out dirt, drafts, and insects.
- Dual Zippered Doors With Rain Flaps for easy access from either side and waterproofness.
- Peak Vent for ventilation and condensation prevention.
- Hang Loops to attach 6 person liners, gear, and accessories inside tent, keeping items off the ground.
SIZE GUIDE:
- Sleeps 6 without stove
- Sleeps 3 with stove
- Sleeps 2-3 ultralight short cots with a stove
- Need one size smaller? See the Cimarron
- Need one size bigger? See the 8 Person Tipi
- Similar size in a pyramid shape? See the Redcliff
SPECIFICATIONS:
Weight:
- Canopy: 59 oz / 3 lb 11 oz
- Complete weight - canopy, stakes, Carbon Pole - 83 oz / 6 lb 8 oz
- Door screens add 14 oz
- Aluminum Pole adds 1 lb. 4 oz.
Dimensions:
- Height: 7' 10″
- Diameter: 14'
- Square Feet: 150
- Square Feet Sitting Area (height above 36"): 59
- Square Feet Standing Area (height above 6 ft): 7
MATERIALS:
Tent Fabric
- 30 Denier Nylon 6.6 Ripstop
- 3000 mm hydrostatic head
- 33% more abrasion resistant than nylon 6
- Ripstop woven, Silicone coated
Stove Jack
- Silicone-coated Fiberglass
- 3,000 f melting point
- Tear and heat resistant material
Peak Cone
- VX42 Xpac, Dyneema
- 2 layered fabrics for extreme tear strength
- Fray and Abrasion Resistant
COMES WITH:
- Aluminum Pole - 6 sections
- 10 twisted stakes and 10 standard stakes.
- Silnet Seam Sealer
PITCHING:
- Put in the primary door stake.
- Take the opposite door stake loop and stretch the tipi out taut (not stretched). Decide where you want to sleep or where to place the stove.
- Place your hand on the door guyout, fold the fabric towards the opposite door. The guyout is the middle of the fold. The stake loop lands very close to the proper setback. (Setback is 2X distance from guyout to sod skirt below stake loop in door.)
- Start setting the seam stake loops next to the doors first, then move from door to door, using the side setbacks.
- The recommended setbacks are for a standard no guy out pitch. If you want more space or better snow shedding, move the setbacks in towards the center by 1-2 inches from the recommended setback, raise the pole by an inch, and use the side guy outs.
SEAM SEALING:
- To seal the shelter, pitch it normally and seal the outside seams. Note: this is difficult on taller tents
- You can run a thin bead of sealant along the seam, press it in with a finger, and wipe away excess on a paper towel.
- Alternatively, you can use an acid brush from a hardware store to spread the sealant.
Seam Sealing Service
INFO ON HOT TENTS:
Temperature Rating
- We use high temp silicone coated fiberglass material, rated to several thousand degrees, for the stove jack. The tent material never touches the hot pipe. If there are any pinholes from floating embers, they can be sealed with a small dab of silicone without damaging the shelter.
Condensation
Carbon Monoxide
- Carbon monoxide is not a concern in these shelters due to the peak vent and air flow from the zipper and sod skirt. If necessary, leave a door unzipped for more venting
FAQ:
I
- The 6 person tipi has more floor area, but the ergonomics of the Redcliff make it feel more spacious. Because the Redcliff is designed around a rectangular floor area, the Redcliff may feel more spacious than the circular floor plan of the 6 person tipi
Can I run a stove with the half nest?
- Yes! The Cimarron/ Redcliff half nest will work while using a stove. This is a great option for those that want a bucket floor and bug netting while using a stove inside the Redcliff
6 Person Standing / Sitting 360 VR
6 Person 360 Look Around
|
This tipi liner creates a double-wall barrier that catches condensation before it drips on you while improving warmth and reducing condensation. One half provides door-to-door coverage or use two for full 360° interior protection – remove when you want to go lighter.
Key Features:
-
Condensation Barrier – Shields against dripping walls by creating a breathable inner layer.
-
Modular & Adjustable – Two halves provide full coverage, allowing you to customize your setup.
-
Lightweight & Removable – Leave it in for extra protection or strip it out when every ounce counts.
-
Packable Design – Includes a compact stuff sack for easy storage and transport.
Built for Performance:
Made from 20D ripstop nylon with a DWR finish, this liner balances durability and breathability—keeping you comfortable in all seasons.
Important Note: This is not a floor—it’s an inner liner that hangs inside your tipi. Need a floor? Find the right one here.
Includes stuff sack and cordage
weight: 12.5 ounces per half
Installation:
The top of the liner has toggles that insert through hang loops on the interior of the shelter. The bottom of the liner has linelocs that accept cordage that is tied to the stake loops.
To Install:
- Start at the door and install the top edge toggle of the liner through the hang loop of the shelter.
- Work from that seam to the opposite door, installing the toggles as you go.
- Tie the cords to the stake loops, then run the free end of the cord through the corresponding linelocs on the liner. (A larkshead loop in the cord and then looped around the stake loop works well.)
- Tension the liner by tightening the cord in the linelocs.
Tips:
- If you are staking with the outer stake loops, tie the cord to those loops and not the interior. This gives you more span to tension the liner.
- The liner can sag a bit when wet. Adjusting the pole higher or adjusting the linelocs tighter alleviates this. Running the stove to dry out the interior does as well.
- The liner runs from door zipper to door zipper, but does not cover the area under the zipper.
- If you leave the liner in your shelter, loosen the cords in the linelocs at the bottom before taking the shelter down. This will make it easier to pitch when you put it back up.
|
This tipi liner creates a double-wall barrier that catches condensation before it drips on you while improving warmth and reducing condensation. One half provides door-to-door coverage or use two for full 360° interior protection – remove when you want to go lighter.
Key Features:
-
Condensation Barrier – Shields against dripping walls by creating a breathable inner layer.
-
Modular & Adjustable – Two halves provide full coverage, allowing you to customize your setup.
-
Lightweight & Removable – Leave it in for extra protection or strip it out when every ounce counts.
-
Packable Design – Includes a compact stuff sack for easy storage and transport.
Built for Performance:
Made from 20D ripstop nylon with a DWR finish, this liner balances durability and breathability—keeping you comfortable in all seasons.
Important Note: This is not a floor—it’s an inner liner that hangs inside your tipi. Need a floor? Find the right one here.
16 ounces per half
Color: white
Includes stuff sack and cordage
Installation:
The top of the liner has toggles that insert through hang loops on the interior of the shelter. The bottom of the liner has linelocs that accept cordage that is tied to the stake loops.
To Install:
- Start at the door and install the top edge toggle of the liner through the hang loop of the shelter.
- Work from that seam to the opposite door, installing the toggles as you go.
- Tie the cords to the stake loops, then run the free end of the cord through the corresponding linelocs on the liner. (A larkshead loop in the cord and then looped around the stake loop works well.)
- Tension the liner by tightening the cord in the linelocs.
Tips:
- If you are staking with the outer stake loops, tie the cord to those loops and not the interior. This gives you more span to tension the liner.
- The liner can sag a bit when wet. Adjusting the pole higher or adjusting the linelocs tighter alleviates this. Running the stove to dry out the interior does as well.
- The liner runs from door zipper to door zipper, but does not cover the area under the zipper.
- If you leave the liner in your shelter, loosen the cords in the linelocs at the bottom before taking the shelter down. This will make it easier to pitch when you put it back up.
|
This tipi liner creates a double-wall barrier that catches condensation before it drips on you while improving warmth and reducing condensation. One half provides door-to-door coverage or use two for full 360° interior protection – remove when you want to go lighter.
Key Features:
-
Condensation Barrier – Shields against dripping walls by creating a breathable inner layer.
-
Modular & Adjustable – Two halves provide full coverage, allowing you to customize your setup.
-
Lightweight & Removable – Leave it in for extra protection or strip it out when every ounce counts.
-
Packable Design – Includes a compact stuff sack for easy storage and transport.
Built for Performance:
Made from 20D ripstop nylon with a DWR finish, this liner balances durability and breathability—keeping you comfortable in all seasons.
Important Note: This is not a floor—it’s an inner liner that hangs inside your tipi.
Weight: 20 ounces per half.
Installation:
The top of the liner has toggles that insert through hang loops on the interior of the shelter. The bottom of the liner has linelocs that accept cordage that is tied to the stake loops.
To Install:
- Start at the door and install the top edge toggle of the liner through the hang loop of the shelter.
- Work from that seam to the opposite door, installing the toggles as you go.
- Tie the cords to the stake loops, then run the free end of the cord through the corresponding linelocs on the liner. (A larkshead loop in the cord and then looped around the stake loop works well.)
- Tension the liner by tightening the cord in the linelocs.
Tips:
- If you are staking with the outer stake loops, tie the cord to those loops and not the interior. This gives you more span to tension the liner.
- The liner can sag a bit when wet. Adjusting the pole higher or adjusting the linelocs tighter alleviates this. Running the stove to dry out the interior does as well.
- The liner runs from door zipper to door zipper, but does not cover the area under the zipper.
- If you leave the liner in your shelter, loosen the cords in the linelocs at the bottom before taking the shelter down. This will make it easier to pitch when you put it back up.
|