Backpack Hunting Meat Care
I sat next to my bull, serene and peaceful, watching the early morning light glint off the frost in the aspens. The pungent musk of the bull hung in the thin mountain air, crisp with cold.
It smelled like elk hunting, something that only an elk hunter will appreciate.
Giving thanks, I absorbed the moment, knowing I had work to do.
A hunter’s responsibility
A harvested animal is a gift and an accomplishment, but also a responsibility. Love for the sport and love for the animals we pursue require hunters to be good stewards of the resource by taking home as much meat as possible.
Often miles from the trailhead, it is both a logistical and physical challenge for the backpack hunter to minimize loss due to spoilage, contamination, or missed cuts.
Increasing Yield
Increasing yield boils down to which butchering method you use, how well you execute that method, and minimizing contamination and the chance for spoilage.
Butchering Methods
I grew up in the East hunting whitetails, and if at all possible we field dressed game and then recovered them whole. The reason? Yield.
By recovering whole virtually all of the meat is kept clean until hung. With working tables, knives, saw, meat bins, vacuum sealer, and water close at hand the job is easy and any losses due to contamination or sloppy cuts are minimal.
It’s a different story when you’re three miles from the trailhead and your bull is on a 40° slope and the only thing keeping him there is an aspen that he wedged against after sliding downslope.
On a backpack hunt recovering whole is often impossible. The size and location of western big game dictate butchering in place, and this means that field dressing is frequently a bad idea for two reasons.
- First, it creates a dirty work environment that increases the chances of contaminating meat.
- Second, it isn’t necessary. All major cuts of meat can be taken without field dressing.
Gutless Method
While backpack hunting I strongly prefer the gutless method of butchering. Gutless means that you are exposing only the cuts you are working on and nothing else, keeping things cleaner. It is also the most direct way to access meat, resulting in less work.
There are enough good videos available on the gutless method that I won’t dive into great detail here on how to do it, but I will list one for you to watch.
Quarter or Debone?
Ever wonder why the safe cooking temperature of hamburger is much higher than a steak? Hamburger has a lot more surface area. That surface area means hamburger is much more easily contaminated than a steak is.
The same applies with quarters and deboned meat. A quarter has much less exposed surface area than the same quarter deboned, and thus less chance of dirt or hair contaminating the meat.
Quarters stay cleaner than deboned meat, resulting in a higher yield. The downside is that quarters weigh more as you’re packing bone as well as meat.
Boned out meat cools faster than quarters for the same reason - surface area. So if your temperatures are iffy for hanging, deboning will get the meat temp down quicker.
This is your decision. Quartering makes sense for easier packouts, while deboning may be wise if you’re high and deep.
Knife Skills
I can fillet an elk quarter off the bone and bring it off in one large chunk. This minimizes the chance of contamination vs. cutting roast or steak sized pieces in the field. Bigger chunks equal less trim and higher yield.
Filleting is key to keeping meat in big pieces, and not missing cuts. I find the bone in the piece I’m working on, and then make small cuts at the junction of bone and meat, always cutting toward bone. In this manner meat peels off the bone with very little loss.
The key is to take your time, use your head, and to reposition when needed. Hastiness will cause you to miss meat. Talk to western big game processors and they will tell you that deboned or bone-in quarters often show up without the sirloin, which is on the flat of the pelvis and easy to miss.
Experience is the best teacher, but lacking experience, studying a few videos will help prepare you for clean knife work.
CWD Concerns
Chronic Wasting Disease is becoming more of a concern as animals across the US are testing positive each year.
There is a lot of hype about CWD, so let’s take a moment and clear up what we know:
- There is no known transmission to humans.
- CWD is 100% fatal to deer and elk once they’re infected.
- CWD is caused by prions, not bacteria or virus, and prions are extremely hard to kill.
CWD is caused by chains of proteins called prions that cause abnormalities in the brain and spinal system. These prions are completely different than a bacteria or virus in that regular cooking doesn’t destroy them.
Prions can survive in the soil for at least two years, and to destroy them by cooking it takes several hours of 900° F temperatures.
CWD spreads through saliva, feces, or urine. Since the prions are so hardy and persist in the soil for a long time, it increases the chance of spread to other animals.
So what does this mean for hunters?
Our first priority is to be good stewards of the resource by not spreading CWD to areas that it is not found already. The disease is deadly to deer and elk and fatal once they are infected.
Containing the threat means that only meat and no bones be brought home. It also means that skullcaps or skulls for Euro mounts be completely cleaned of all nervous tissue and brain matter before leaving the hunting area.
Field handling tips include removing the major cuts of meat before getting neck meat. Don’t saw through the neck to make roasts as it can lead to contamination.
Sawing the skullcap or removing the skull should be the last step in the butchering process to avoid contamination of meat with nervous tissue or brain matter.
Tools that come in contact with brain matter or nervous tissue need to be forever dedicated to ONLY that purpose and not cutting meat. Prions can bond to metal and become extremely hard to destroy. Alcohol, bleach, and the like won’t effectively disinfect tools that come in contact with prions.
Most identified CWD areas across the West offer testing of harvested animals. As the incubation period of the disease can be two to four years with no outward signs of infection, it is a good idea to have your animal tested. Meat that tests positive should not be eaten.
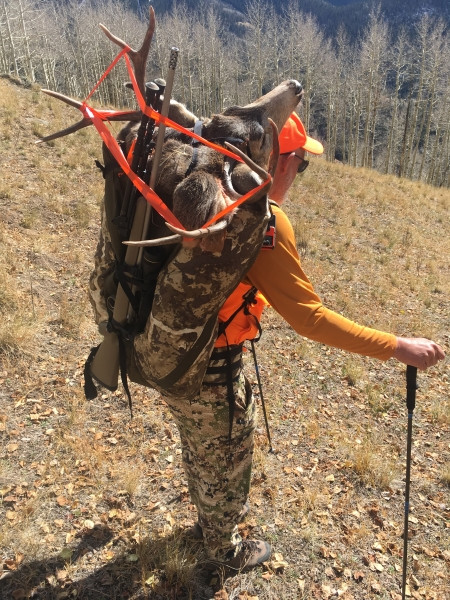
Packout Logistics
A boned out medium sized bull elk will result in roughly 180 lbs of deboned meat, excluding skullcap or cape. You can likely add 25 lbs or more for bone-in quarters, or add 30-50 lbs for a big bull.
Let’s do some packout math. You’re on a solo archery elk backpack hunt five miles from the trailhead in rough country off trail with 2,000 feet of elevation loss to get to your vehicle. You are fortunate enough to arrow a bull on the first morning. It is 40° F now with a high of 75°F expected today.
A medium to small bull usually breaks down into three loads. Five miles out, five in, five out, five in, five out. Twenty-five miles and 10,000 feet of elevation change before the meat spoils in warm weather is a hard task.
The moral of the story? Use your head and know your limits. Have the packout settled and sure before taking a shot.
Cold weather makes the task much easier as you can hang meat for days in the shade, allowing time to packout over several days if needed.
Tools of the Trade
Experience with the tools you use is more important than the tools themselves. However, there are a few necessities and other “nice-to-haves” that can make meat care easier.
My backcountry kill kit contains:
- Caribou Gear Game Bags
- Good fixed blade knife
- Replaceable blade knife (and extra blades)
- Lightweight fine toothed folding saw (great for wood, will also cut bone)
- DMT folding diamond sharpener
- Nite Ize gear tie (many uses, can use as an improvised tripod to take photos of yourself with a cellphone)
- Cordage
- LED keychain light (long runtime, can hang to mark a location at night)
- Orange flagging
- Meat Hook (with a wine cork protecting the point)
- Polycro (lightweight plastic sheeting)
- Thick latex gloves (two pair)
- One cut proof glove (kevlar)
This isn’t a definitive list by any means, and I do substitute gear depending on the trip. I will highlight a few items here that have proven their worth.
A meat hook can be found at any meat processing supplier, and this tool is invaluable for butchering. The meat hook has a four fingered grip, meaning your off hand doesn’t get worn out, and the hook makes it very easy to get a grip on large pieces of meat. Another benefit is that the meat hook gets your fingers away from the cutting and reduces your chances of an accident.
Polycro is simply industrial shrink wrap. I take a couple large sheets to make a ground cloth around the work site, and find that this greatly reduces dirt or debris contamination. I choose polycro over a painters tarp or tyvek due to weight….this is a single purpose item so ounces matter.
A cut proof glove is awesome to have when you’re on a steep sidehill breaking down your buck by headlamp. One slip of the blade can turn a routine chore into a frustrating and painful, or even a serious, event. Kevlar gloves are lightweight, easy to pack, and well worth taking. Make sure you wear your glove for an extended time prior to your trip, as I have had one chafe a raw spot between my fingers due to bad fit.
Putting it Together
Backpack hunting meat care is a specialized challenge and requires preparation. By doing some homework, having the right tools, knowing your physical limits, and keeping the logistics of a packout in mind before taking a shot, you will maximize meat yield. As hunters we owe it to ourselves and to the resource to do our best.
Backpack Hunting Series
Want more articles on Backpack Hunting? Read more in this series: